DIY Framed Wallpaper Panels


I’ve been diligently working on transforming Kennedy’s bedroom and playroom into one cohesive space, and I couldn’t be more thrilled with the progress I’ve made. Witnessing my design visions come alive is truly gratifying, especially when it comes to creating magical spaces for children. Drawing inspiration from her nursery, I centered the room’s design around a captivating whimsical wallpaper.
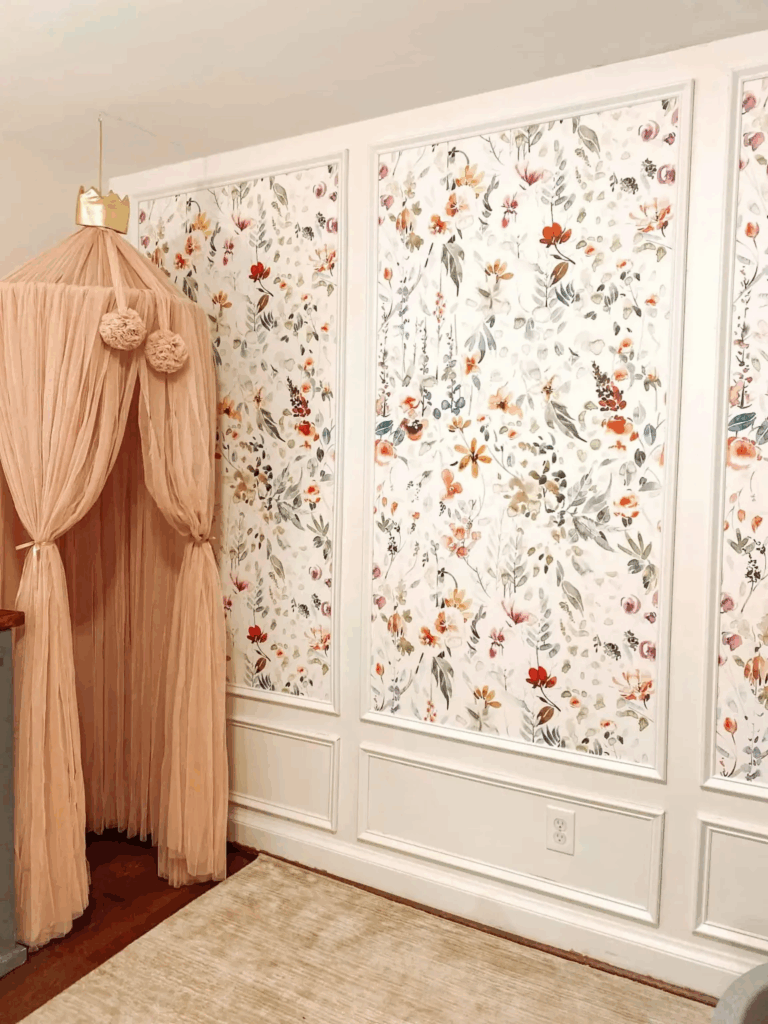
I knew I wanted to do some sort of paneling combined with wallpaper, and envisioned three framed wall paper panels as a backdrop. The picture frame wallpaper backdrop is finally complete and I think it adds so much character, texture and just the right amount girly whimsical detail I was looking for.
Here’s how I did it!
What You’ll Need:
- Wallpaper (I used peel and stick for this project)
- Wallpaper smoothing tools (my kit came with a roller, squeegee, and a blade)
- Miter box+hand saw OR miter saw
- Liquid nails for paneling
- Ryobi AirStrike cordless nail gun
- Sandpaper or sanding block
- Wood/nail hole filler
- Nail setter
- Tape measure
- Level
- White paint
Steps:
- Determine how many panels you want to have for your accent wall, so you know how much wallpaper to order. I ordered 3 panels, and ensured the length was long enough to cover about ~¾ the length of the wall. For reference, my ceilings are 8 feet and I ordered 3 panels (each panel measured 34″width x 69″length)
- Measure the wall where your panels will go to determine spacing. It helps to create a mock up on paper to ensure you have even spacing in between and on top/bottom of the panels. (I included my mock below with the calculations!)
- Mark your wall where the wallpaper will go. I used a pencil and marked the tops of the boxes with painters tape and a level so I could see how the layout would look before attaching any material to the wall.
- Hang your wallpaper panels, following the instructions based on the type of paper you purchased. Mine was peel and stick, so the only tools I used were a roller and squeegee to smooth out bubbles.
- Measure around the wallpaper panels to determine how long to cut your moulding frame pieces. Measure and mark the moulding for the bottom rectangle pieces too. Cut all your frame pieces in a 45 degree angle. I don’t own a miter saw, so I cut all my moulding with a miter box and hand saw. In retrospect, I would borrow some power tools from my dad because this step was tedious by hand and my cuts weren’t as precise as I’d like them to be.
- Once your moulding pieces are cut, paint them. Mine came pre-primed, but I painted them with one coat of paint to match our built-ins and trim, which was a color match of IKEA white.
- One by one, add liquid nails to the moulding pieces and attach to the wall in frame shape around the wall paper panels, removing your painters tape as you go. I started with the top piece, then the two sides and bottom. Use your level, and secure frames with nail gun. (Highly recommend recruiting a helper when securing the frames to make sure you don’t get glue on the wallpaper and that your pieces are level.)
- Attach your bottom frames in rectangle shape using same method as above.
- Once all your frames are attached, make sure your nails are set, patched and sanded. Because my cuts were done by hand, I also had to use wood filler on some of the corner pieces to ensure a seamless frame.
- Touch up with paint.
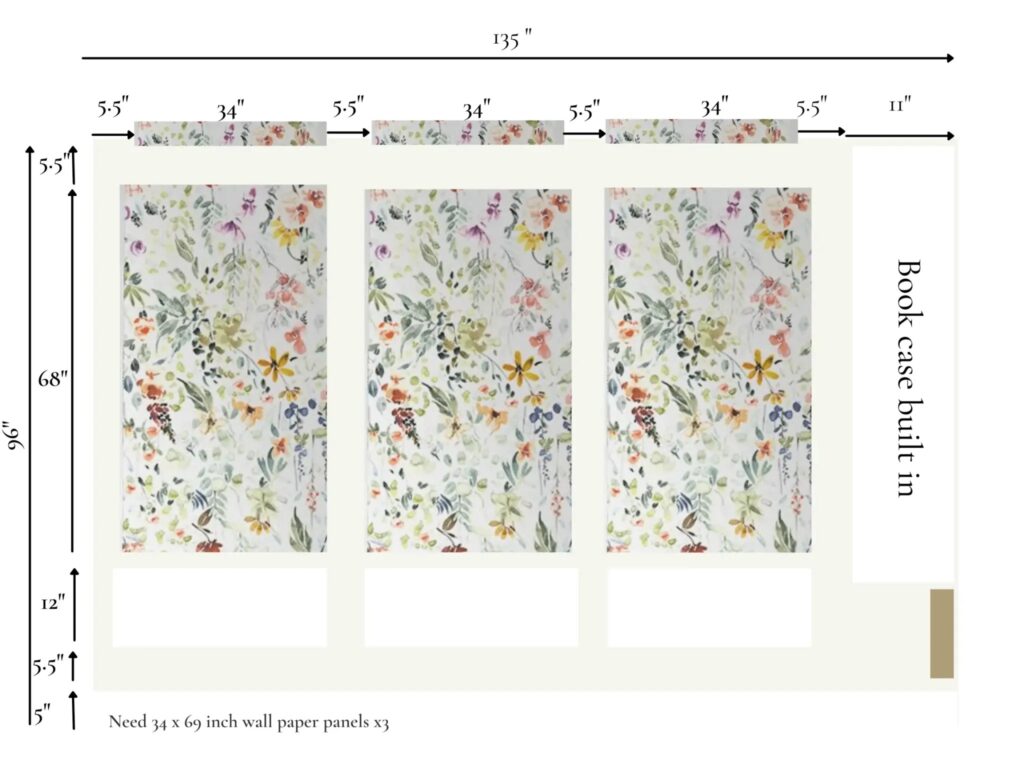
Here’s how I determined spacing for my paneling:
- Measured the full width of my wall: 135″, subtracting out my built in bookcase that I was simultaneously building (11″) which left me with 124″ of total width.
- Each of my three panels were 34″ wide so I subtracted the total panel width (34″ x 3 = 102″). 124″ – 102″ = 22″. 22″ was my amount of space left over.
- Since I was using 3 panels, I knew I was going to have 4 spaces (2 on outside ends, and 2 on either side of middle panel.) I then divided my space leftover calculated in step two (22″) by 4spaces to determine my panel spacing. In my case,5.5 inches between each panel (22″/4″=5.5″)
This project is far from perfect (so don’t look too close 😉 ), but it was done with love and my daughter loves it so that’s all that matters!
Disclaimer
Affiliate links are used in this post for your shopping convenience. See Disclosure & Privacy Policy for more info.


